

Theme builders like Oxygen have been the best thing to happen to WordPress in a long time.
And while do have have way more control over our sites now, there are some dynamic features that themes simply handled for us that aren’t as easy to replicate.
One of these features is dynamic author bio social icons.
You know, these social icons that appear in the author box typically found at the bottom or side of a blog post:
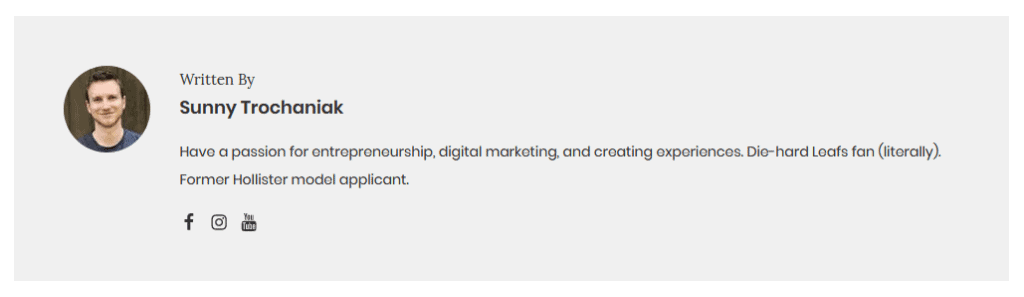
It’s easy to put in social icons, but it’s not as easy to put in icons that change based on the blog post’s author.
That’s what I’ll show you how to do in this tutorial 🙂
The Process
Here’s a quick look at what we’ll be doing:
- Install Advanced Custom Fields and set up our fields
- Fill out our social profile URLs
- Install the Code Snippets plugin and insert our custom snippet
- Set up the display conditions in Oxygen
- Set up the dynamic URLs in Oxygen
- Profit
1. Setting Up Our Custom Fields
The first thing you’ll want to do is make sure you have Advanced Custom Fields installed if you don’t already.
From there, create a new field group called “User Profile”. Under Rules, show this field group if User Form is equal to All, OR Post is equal to your blog post Oxygen template (select it from the drop down).

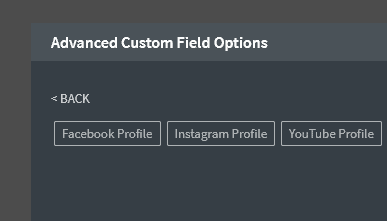
After you’re done setting up the field group, create a new “URL” field type.
Use something like “Facebook Profile” for the Field Label, and “facebook_profile” for the Field Name.
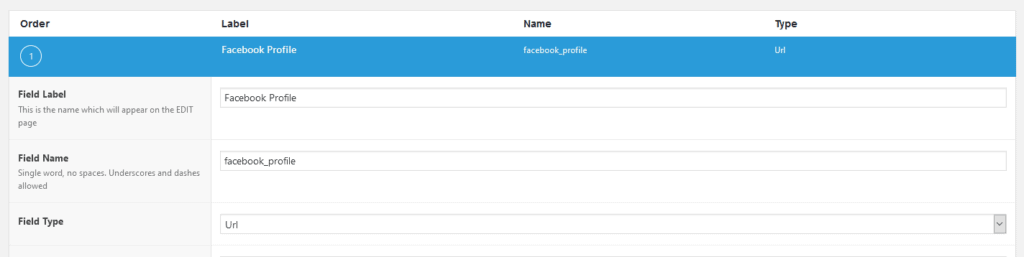
Now repeat this process for every social network that you want to include.
2. Fill Out Profile URLs
If you go to your user profile, you should now see a section with all your profile fields.
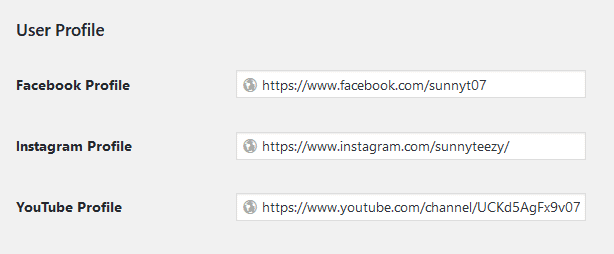
You may want to leave one blank for now, just so we can test that the show/hide conditions are working properly (which we’ll get to in a second).
3. Create the Code Snippet
For us to use this field within Oxygen, we’ll need to create some PHP functions. You can download the Code Snippets plugin, create a new snippet and call it something like “ACF User Meta for Oxygen”.
Then copy/paste this code:
function get_facebook_profile() {
$author_id = get_the_author_meta( 'ID' );
$facebook_profile = get_field('facebook_profile', 'user_' . $author_id);

return $facebook_profile;
}

function get_instagram_profile() {
$author_id = get_the_author_meta( 'ID' );
$instagram_profile = get_field('instagram_profile', 'user_' . $author_id);

return $instagram_profile;
}

function get_youtube_profile() {
$author_id = get_the_author_meta( 'ID' );
$youtube_profile = get_field('youtube_profile', 'user_' . $author_id);

return $youtube_profile;
}

function get_twitter_profile() {
$author_id = get_the_author_meta( 'ID' );
$twitter_profile = get_field('twitter_profile', 'user_' . $author_id);

return $twitter_profile;
}

function get_linkedin_profile() {
$author_id = get_the_author_meta( 'ID' );
$linkedin_profile = get_field('linkedin_profile', 'user_' . $author_id);

return $linkedin_profile;
}

function get_website_url() {
$author_id = get_the_author_meta( 'ID' );
$website_url = get_field('website_url', 'user_' . $author_id);

return $website_url;
}
You may need to modify the code a bit so it only includes the social networks you included in Step 1.
Hit Save Changes and Activate.
4. Set Display Conditions in Oxygen
We’re almost there!
It’s time to go into the single blog post template you previously created in Oxygen (if you haven’t yet created one, you’re getting way ahead of yourself with this tutorial :p).
Add some icons for all the social networks you created in Step 1, and get them looking the way you want them to look. Make sure each icon is in a Link Wrapper.
We’re going to add a display condition to each Link Wrapper.
Click the Conditions icon in the left panel > Set Conditions > Add Condition > Choose Condition… Dynamic Data > PHP Function Return Value > enter “get_facebook_profile” for the function name.
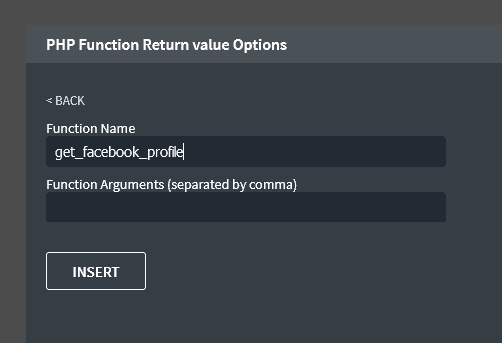
Then set the operator to “is_not_blank”.
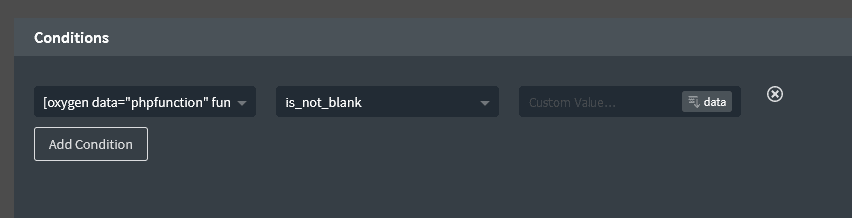
Close the conditions window, and repeat the process for each social icon.
5. Add the Dynamic URL
The last thing we need to do is add our dynamic URL to each link wrapper.
Click on the Link Wrapper, in the URL field click on the data box > Advanced Custom Field > choose the appropriate field.
That’s it! You should now have social icons that show/hide based on whether the author has their profile fields filled out, and of course show the profile link attached to their user profile.
(You can see a working demo of this at the bottom of this post).